In this blog, I’ll teach you how to set up routes in Ruby on Rails and how to install Material UI. Scroll down for both of those, if you wish to skip to the point.

Picking up the pace…
Firstly, I would like to start off and give a brief summary of the last few weeks at Flatiron School. I struggled with Ruby initially during the last phase, so Ruby on Rails was a very difficult challenge for me at first. But I believe that my knowledge over the past few weeks has only helped me understand the backend to an ever greater extent. The challenge of organizing data with a model, view, controller (MVC) format was an interesting way to conceptualize the information, but just like anything. Practice made me understand it more and more. I think that with more time, I can really see myself enjoying Rails because it truly does help me understand what it takes to be a full-stack developer. I actually have started to like Ruby more and more. With this all being said, I have officially taken my last code challenge at Flatiron School. It’s insane to think that these last few weeks have gone by so quickly, and I’m seriously in the middle of changing my career. But before it’s all over I have to make sure that I’m on top of everything, being that I have the biggest phase of them all approaching—my capstone, followed by the job search. Onwards and Upwards!
Project Time
To start the project off, my partner and I knew we had a lot on our plate, so we started to prepare a few days earlier. This is what we decided to do.
Requirements:
- Use a Rails API backend with a React frontend.
- Have at least two models with a one-to-many relationship on the backend, with full CRUD actions for at least one resource. (More than two related models is also fine — if you need three models and a many-to-many relationship, go for it!)
- Have at least two different client-side routes using React Router.
- Implement authentication/authorization. At a minimum, a user should be able to log into the site and stay logged in via user ID in the session hash. Password protection is optional.
Moving forward, after my partner, Hain, and I were given the deliverables, we knew that we would need to make some charts and diagrams to really understand the task that we had on our plate. We wanted to build something that would not only check off the deliverables but would also challenge us to build a really amazing project. We decided to build a Wiki app based on the new video game, Elden Ring. Since we don’t have it yet, due to studying countless hours during this program we decided it’d be best to live vicariously through everyone else and make our app! The initial idea was that we would build something for everyone to use to understand everything about the game, but we quickly realized that it would take too much time to simply gather data, and because of that we wanted to make sure we were protecting our own innocence, rather than spoiling the game. We chose to shift the purpose to be an index for users to collect their own data, based on the encounters that they come with during the game. Here is our detailed project pitch:


After creating the Project Pitch, we knew that we would need to have some wireframes and an entity diagram to properly understand what we were planning. I highly recommend doing this because I think that it brings a different level of understanding to your project and really helps you organize what you’re going to be doing in the future. Here is ours listed below.
Formulating the Back End
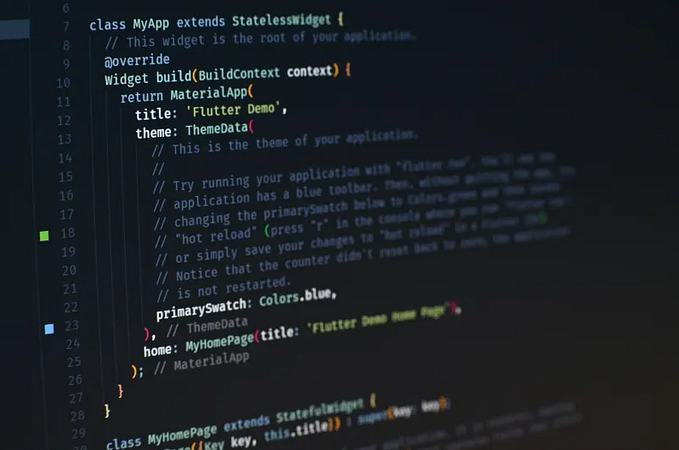
The first objective of the project was to create the backend. The first thing I’m going to talk about today was setting up the routes with Ruby on Rails.

As you can see in the indicated picture above, we decided to create 3 different models where the user has the ability to add new cards to the database. The information on these cards was organized into Classes, Spells, and Skills. After looking adding the proper information (managed with validations on the backend), the user has the ability to Create, Read, Update, and, Delete any of these cards. We also added a login/logout feature that I am very proud of and will talk more on in a later blog post. To have these routes, our controllers looked like this:
After this, it is best to have your routes set up in config/routes.rb, to only include the ones you are comfortable building. Like this:
Rails.application.routes.draw do resources :er_classes, only: [:index, :show, :create, :update, :destroy]end
We then created some seed data to actually bring the information up to the DOM.
Learning something new, Material UI!
The following process is similar to all of the other projects I have had so I will not really detail too much of the information. Instead, I’ll talk a little bit about Material UI and how my partner and I were able to implement it for this project!
What is Material UI (MUI)?
MUI provides a robust, customizable, and accessible library of foundational and advanced components, enabling you to build your design system and develop React applications faster ~ Mui.com
It’s essentially a React UI library that makes it easier to make your website look professional and pretty. Companies like Netflix, Spotify, Amazon, Nasa, Unity, and Shutterstock all use it! Let’s get started and then I’ll show you how to use it. You’re going to want to run
// with npm
npm install @mui/material @emotion/react @emotion/styled

// with yarn
yarn add @mui/material @emotion/react @emotion/styled// with npm
// to install icons
npm install @mui/icons-material

// with yarn
// to install icons
yarn add @mui/icons-material
And that’s it. After this, I recommend visiting the documentation to look at all the different components and see what you want to use. It’s really that simple! You can import a NavBar like I did over here in our own project. Below is the video, you can see some of the styling done with MUI!
That’s all folks!
If you got this far, thank you! Here is the summary video, enjoy.
I may have missed a few things in the video explanation, if you have any questions about the functionality send me a message through my website.